Developer Guide
- Introduction
- Setting up, getting started
- Design
- Implementation
- Documentation, logging, testing, configuration, dev-ops
- Appendix: Requirements
- Appendix: Instructions for manual testing
Introduction
MediBook is a desktop medical records software targeting doctors and administrative staffs in clinics or hospitals to help manage patient details. It is optimized for use via a Command Line Interface (CLI) while still having the benefits of a Graphical User Interface (GUI).
This developer guide helps you get familiar with the architecture design of the program and the implementation details of main features.
Setting up, getting started
Refer to the guide Setting up and getting started.
Design
Architecture

The Architecture Diagram given above explains the high-level design of the App. Given below is a quick overview of each component.
.puml files used to create diagrams in this document can be found in the diagrams folder. Refer to the PlantUML Tutorial at se-edu/guides to learn how to create and edit diagrams.
Main has two classes called Main and MainApp. It is responsible for,
- At app launch: Initializes the components in the correct sequence, and connects them up with each other.
- At shut down: Shuts down the components and invokes cleanup methods where necessary.
Commons represents a collection of classes used by multiple other components.
The rest of the App consists of four components.
-
UI: The UI of the App. -
Logic: The command executor. -
Model: Holds the data of the App in memory. -
Storage: Reads data from, and writes data to, the hard disk.
Each of the four components,
- defines its API in an
interfacewith the same name as the Component. - exposes its functionality using a concrete
{Component Name}Managerclass (which implements the corresponding APIinterfacementioned in the previous point.
For example, the Logic component (see the class diagram given below) defines its API in the Logic.java interface and exposes its functionality using the LogicManager.java class which implements the Logic interface.

How the architecture components interact with each other
The Sequence Diagram below shows how the components interact with each other for the scenario where the user issues the command delete 1.

The sections below give more details of each component.
UI component

API :
Ui.java
The UI consists of a MainWindow that is made up of parts e.g.CommandBox, ResultDisplay, PatientListPanel, PatientProfile, StatusBarFooter etc. All these, including the MainWindow, inherit from the abstract UiPart class.
The UI component uses JavaFx UI framework. The layout of these UI parts are defined in matching .fxml files that are in the src/main/resources/view folder. For example, the layout of the MainWindow is specified in MainWindow.fxml.
The PatientListPanel and PatientProfile utilises the same space in the MainWindow. The Logic component indicates to MainWindow if there is a need to toggle between the two UI parts based on user commands.
The PatientProfile is made up of additional parts inheriting from the abstract UiPart class, not shown in this diagram. You may refer to this section to learn more about the PatientProfile.
A JavaFx TableView is used for the PatientListPanel. Styling for the TableView is done using the TableView.css file which is also in the src/main/resources/view folder.
The UI component,
- Executes user commands using the
Logiccomponent. - Listens for changes to
Modeldata so that the UI can be updated with the modified data.
Logic component

API :
Logic.java
-
Logicuses theMediBookParserclass to parse the user command. - This results in a
Commandobject which is executed by theLogicManager. - The command execution can affect the
Model(e.g. adding a patient). - The result of the command execution is encapsulated as a
CommandResultobject which is passed back to theUi. - In addition, the
CommandResultobject can also instruct theUito perform certain actions, such as displaying help to the user.
Given below is the Sequence Diagram for interactions within the Logic component for the execute("delete 1") API call.

DeleteCommandParser should end at the destroy marker (X) but due to a limitation of PlantUML, the lifeline reaches the end of diagram.
Model component

Model
API : Model.java
The Model,
- stores a
UserPrefobject that represents the user’s preferences. - stores the medi book data.
- exposes an unmodifiable
ObservableList<Patient>that can be ‘observed’ e.g. the UI can be bound to this list so that the UI automatically updates when the data in the list change. - does not depend on any of the other three components.
-
NameandDateare packaged separately under CommonFields as they are used by multiple components within Model.
Patient
The Patient,
- stores
IC,Name,DateOfBirthandPhoneobjects that represent the patient’s IC number, name, date of birth and phone number respectively. - stores
OptionalsofAddress,Email,Height,Weight,BmiandBloodTypeobjects. - stores a
MedicalNoteListobject which keeps track ofMedicalNoteobjects belonging to the patient. -
Bmiis automatically computed and stored within Optional if bothHeightandWeightare present. - stores
Allergy,ConditionandTreatmentobjects, where each patient can store any number of such objects. -
Allergy,ConditionandTreatmentare considered “medical details”/”medical tags”, and inherit from theTagclass.
Storage component

API : Storage.java
The Storage component,
- can save
UserPrefobjects in json format and read it back. - can save the medi book data in json format and read it back.
- can save the medical notes data in separate json file for each individual patient and read it back.
- can rename or delete the medical note data.
Common classes
Classes used by multiple components are in the seedu.medibook.commons package.
Implementation
This section describes some noteworthy details on how certain features are implemented.
Medical Notes
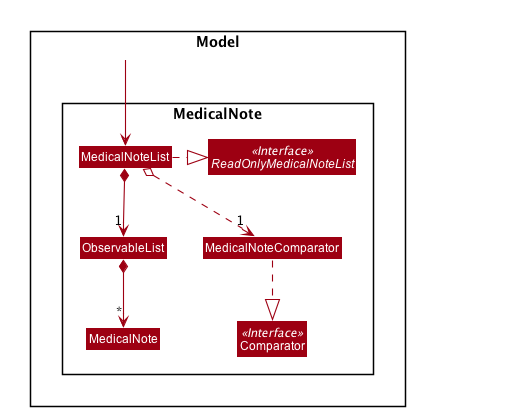
The MedicalNoteList,
- stores
MedicalNoteobjects belonging to a patient - exposes a
ObservableList<MedicalNote>that can be ‘observed’ e.g. the UI can be bound to this list so that the UI automatically updates when the data in the list change. - sorts
MedicalNoteobjects from most recent to least recent using aMedicalNoteComparatorobject
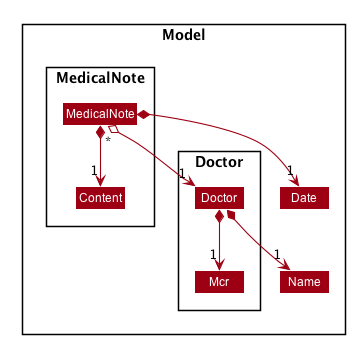
The MedicalNote,
- stores
Date,DoctorandContentobjects that represent the date of creation, doctor who authored the note and content of the note.
Adding medical notes to a patient
Implementation
-
AddNoteCommandParserparses user’s string input into aAddNoteCommand - Target
patientis retrieved fromModelManager#getPatientToAccess() -
doctoris retrieved fromModelManager#getActiveUser()
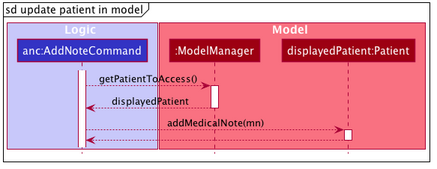
The following sequence diagrams show how add medical note operation works:
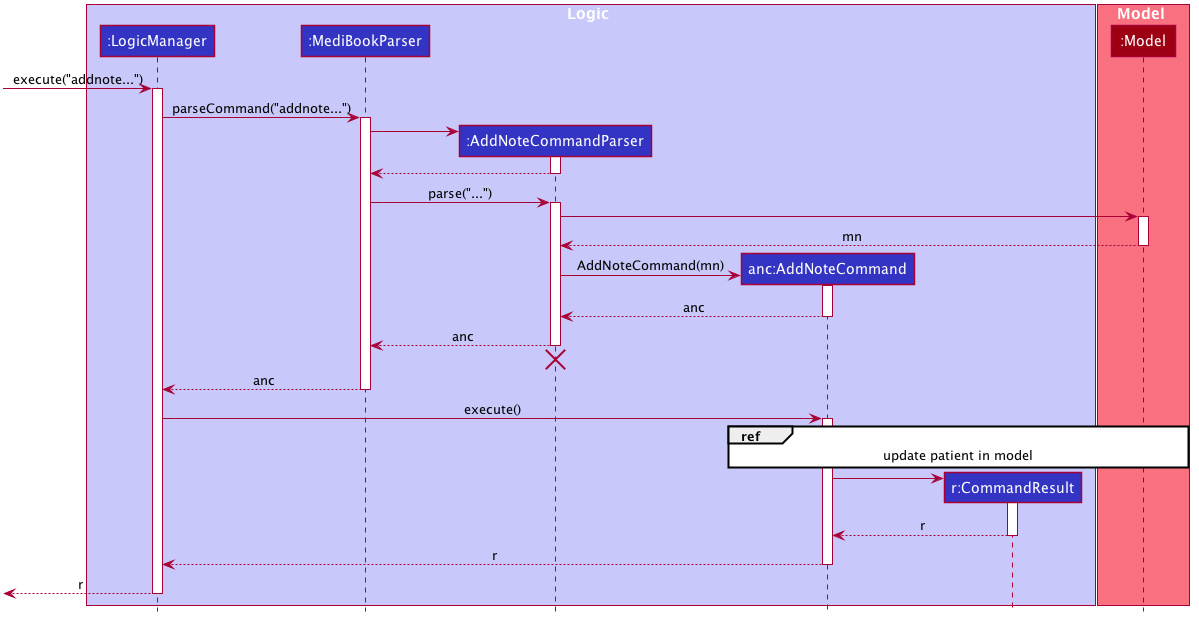
Step 1. While on the patient’s profile page and logged in as a doctor, the user inputs addnote c/Patient....
The user input is handled by LogicManager, which then passes it to MediBookParser to be parsed.
Step 2. MediBookParser creates an instance of AddNoteCommandParser to parse the user input as a AddNoteCommand.
It returns a AddNoteCommand object to LogicManager.
Step 3. LogicManager then executes the AddNoteCommand via AddNoteCommand#execute().
Step 4. AddNoteCommand#execute() identifies the target patient object and the doctor authoring the note.
It then updates the model with the new medical note added to the patient using Patient#addMedicalNote().
Design consideration
addnote command can only be called when viewing a patient’s profile (after an access command)
We have decided to implement addnote command this way for 2 reasons:
- When user starts MediBook, not all
patients’ list of medical notes would have been loaded into the program’s memory. Only allowingaddnoteafteraccessensures that the patient’s list of medical notes would have been loaded at that point. - It allows for a shorter
addnotecommand as the user does not need to specify a targetpatient.
Elaboration on point 1:
- A medical records software contains many
patients, each with potentially manymedical notes. - Every
patientin themodelhas aMedicalNoteListthat is initialised as an empty list at program start-up to optimise start-up time -
MedicalNoteListof every patient is loaded only when necessary. -
access-ing apatientloads the stored medical note list and sets theMedicalNoteListof thepatientto the retrieved list
Deleting medical notes from a patient
Implementation
- The implementation of parsing of a
deletenotecommand is similar to that of aaddnotecommand. - The general action of
DeleteNoteCommand#execute()is similar to that ofAddNoteCommand#execute(). - A key difference is that the
DeleteNoteCommand#execute()verifies that the logged inDoctoris the sameDoctorwho authored theMedicalNoteobject before proceeding with the update.
The following sequence diagram highlights unique aspects of delete note operation:
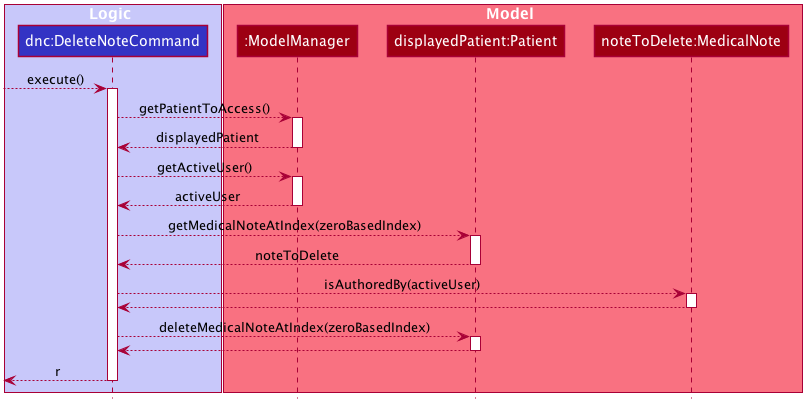
Step 1. LogicManager executes the DeleteNoteCommand via DeleteNoteCommand#execute().
Step 2. DeleteNoteCommand retrieves displayedPatient and activeUser from ModelManager.
Step 3. DeleteNoteCommand verifies that activeUser is the author of the target noteToDelete via MedicalNote#isAuthoredBy(Doctor).
Note that an exception is thrown at this point if the author does not match activeUser.
Step 4. DeleteNoteCommand updates the model with the medical note deleted from the patient using Patient#deleteMedicalNoteAtIndex(int).
Editing medical notes of a patient
Implementation
- The implementation of
EditNoteCommand#execute()makes use ofaddnoteanddeletenoteimplementations.
Step 1. EditNoteCommand identifies the target MedicalNote object.
Step 2. EditNoteCommand verifies that activeUser is the author of the target MedicalNote.
Note that an exception is thrown at this point if the author does not match activeUser.
Step 3. EditNoteCommand creates a new MedicalNote object based on EditNoteDescriptor.
Step 4. EditNoteCommand attempts to delete the target MedicalNote object and add the newly created MedicalNote object.
If the edit results in duplicates, an exception is thrown and no changes are made.
Account creation and logging in
Account creation implementation
The account creation feature is facilitated by a new CreateAccountWindow class in the UI.
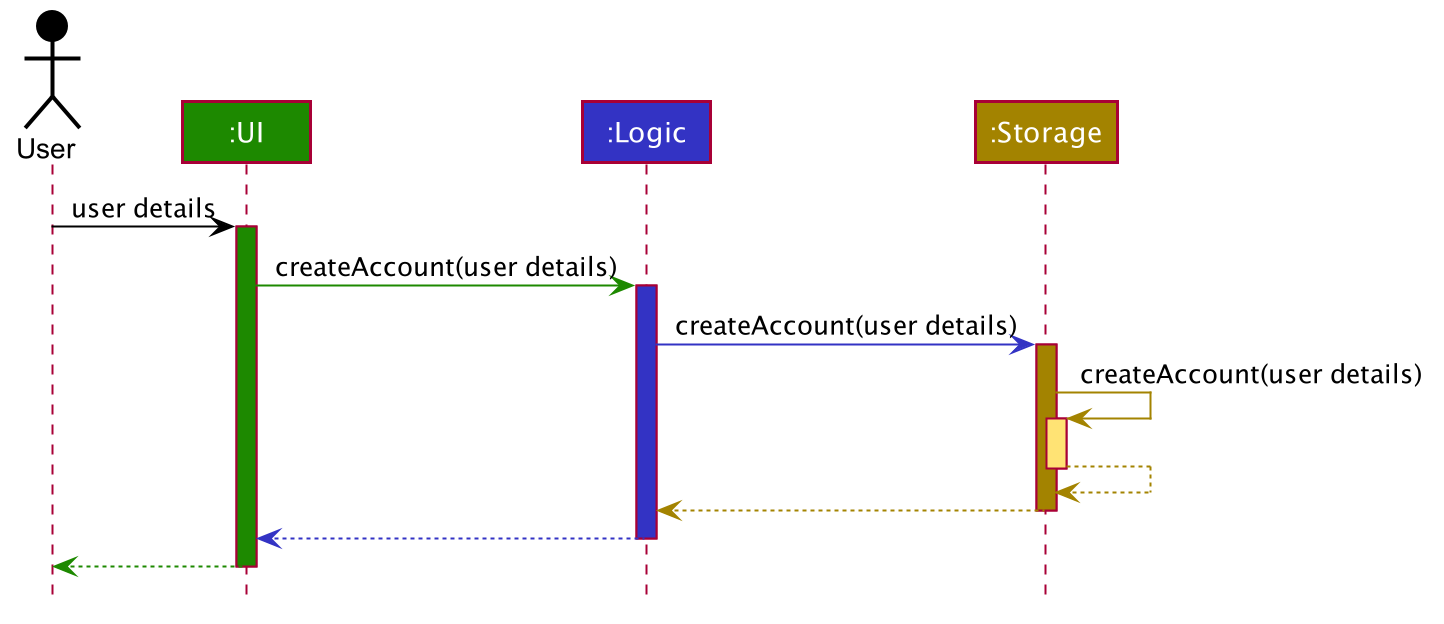
Step 1. The user launches the application and chooses the Create Account option. Then, the user inputs all of the required details.
Step 2. The UI calls Logic#createAccount() with the details input by the user.
Step 3. Storage#createAccount() converts the new account’s username and password into json format and saves it in a accounts.json file.
The following activity diagram summarises what happens when a user attempts to create an account.
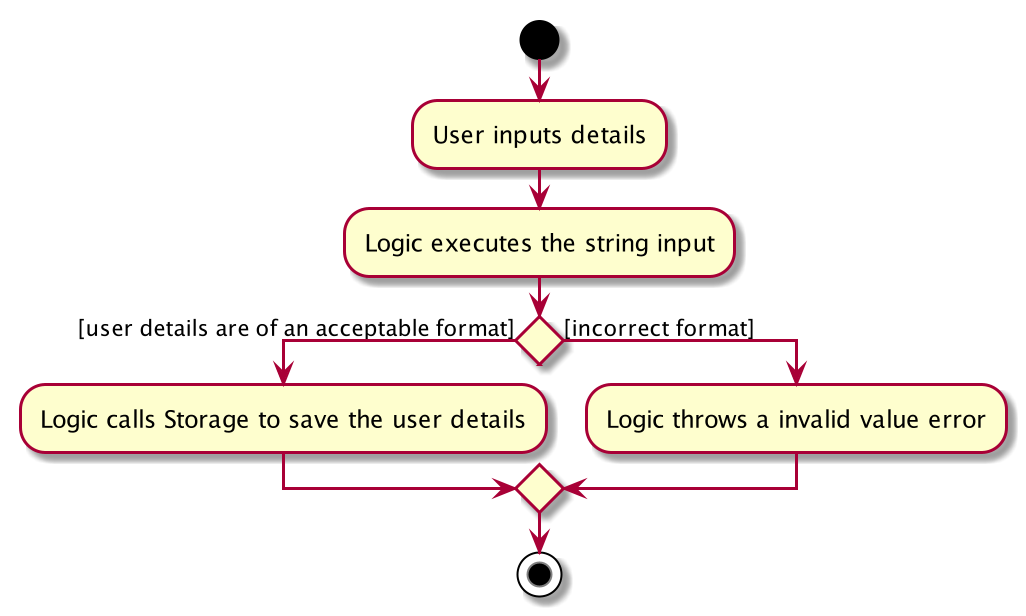
Login implementation
The login feature is facilitated by a new LoginWindow class in the UI.
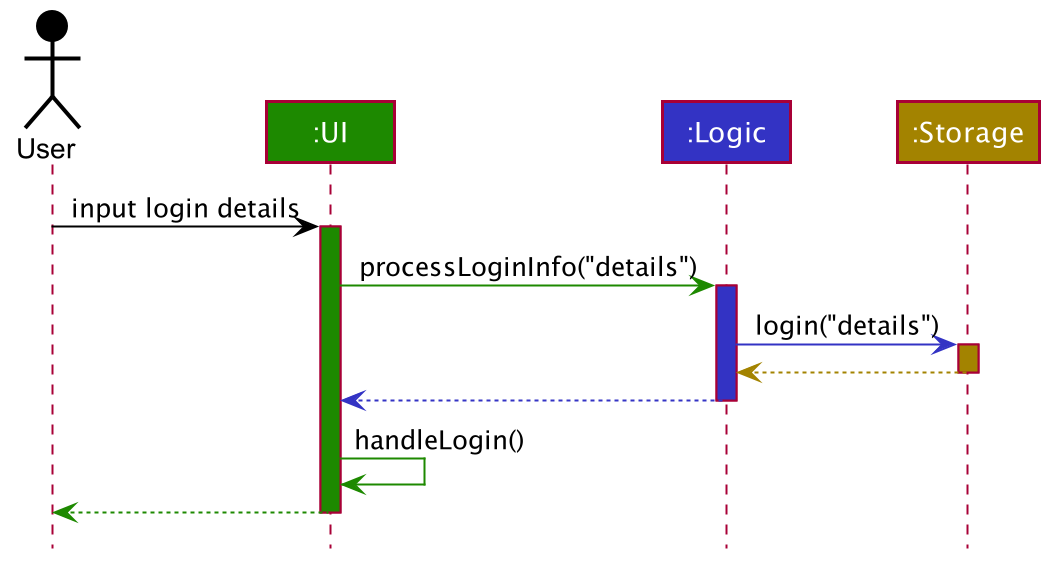
Step 1. The user inputs his/her login information.
Step 2. The UI calls Logic#processLoginInfo() with the login information as input.
Step 3. Logic#processLoginInfo() then calls Storage#login() on the login information, to check if the information matches any of the account details saved.
Step 4. If there is no match, an error is thrown. If there is a match, the UI then changes from LoginWindow to MainWindow, which signifies that the user has succesfully logged in.
Design consideration
We decided to implement this feature due to the nature of our application. Since it is intended for use by medical staff and contains personal information for patients, the ability to protect such information is necessary. Thus, we came up with this feature so that only valid users are able to use the system, thereby protecting the information of every patient the system contains.
[Proposed] Admin accounts
Currently, the system is only capable of allowing the user to create new doctor’s accounts. For all administrative staff, there is only one account that they can use.
By allowing users to create either an admin account or a doctor account, the administrative staff would be allowed to have a personalised account to use the system with. However, as there is no section of the application usable by administrative staff that needs to keep track of the current user, this feature is low priority and we have not implemented it.
Enhanced find command
Implementation
FindCommand supports searching by substring for multiple fields with multiple keywords.
FindCommand is facilitated by FindCommandParser which creates one or more FieldContainsKeywordsPredicate
(which implements the Predicate<Patient> interface) based on the user input.
Through the FieldContainsKeywordsPredicate objects that were created, FindCommand then calls
Model#updateFilteredPatientList(predicate) to filter the list of patient in Model based on the user’s input search query.
The sequence diagram below illustrates how the FindCommand works.
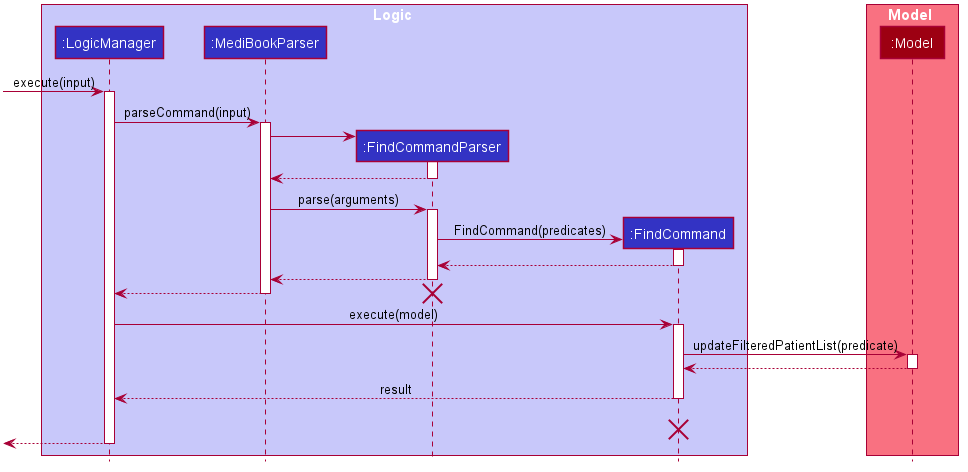
FindCommandParser
and FindCommand should end at the destroy marker (X) but due to a limitation of PlantUML, the lifeline reaches
the end of diagram.
Step 1. The user launches the application and inputs find n/Steve Johnny i/S95 T00 d/2000 1995.
This causes the LogicManager#execute(String input) method to be called.
Step 2. MediBookParser#parseCommand(String input) is then called, creating a new FindCommandParser.
FindCommandParser#Parse(String arguments) is then called and in the process, it creates one or more
FieldContainsKeywordsPredicate instances(not shown in the sequence diagram). In this example, FindCommandParser
creates three FieldContainsKeywordsPredicate instance, corresponding to the three fields to be searched for.
Step 3. FindCommand is initialized with List<Predicate<Patient>> containing the FieldContainsKeywordsPredicate
instances that were created in the previous step. This FindCommand instance in then finally returned as the result for
the MediBookParser#parseCommand(String input) method call.
Step 4. FindCommand#execute(Model model) is called and in turn, FindCommand calls the
Model#updateFilteredPatientList(Predicate<Patient> predicate) method which filters the list of
patient in Model based on user’s input search query.
The diagram below illustrates the class diagram of the relevant classes for the find feature.
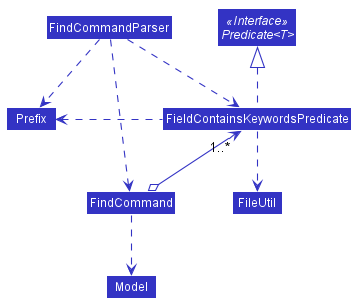
FieldContainsKeywordsPredicate implements the Predicate<Patient> interface.
FieldContainsKeywordsPredicate is initialized with a List<String> containing the keywords to search for and Prefix
which determines which field of the patient to search for. When FieldContainsKeywordsPredicate#test(Patient patient)
is called, it will check if each keyword is a substring of the specified field of the patient. So long as at least one
of the keyword passes the check, FieldContainsKeywordsPredicate#test(Patient patient) will return true.
Patient profile (GUI feature)
This feature allows the application to display a patient’s details in a clean and readable fashion.
Implementation
The class diagram below details the full number of classes in the PatientProfile package, which is simplified in the full UI diagram.
This diagram shows only the classes used to display the patient profile, and the associations between these classes.
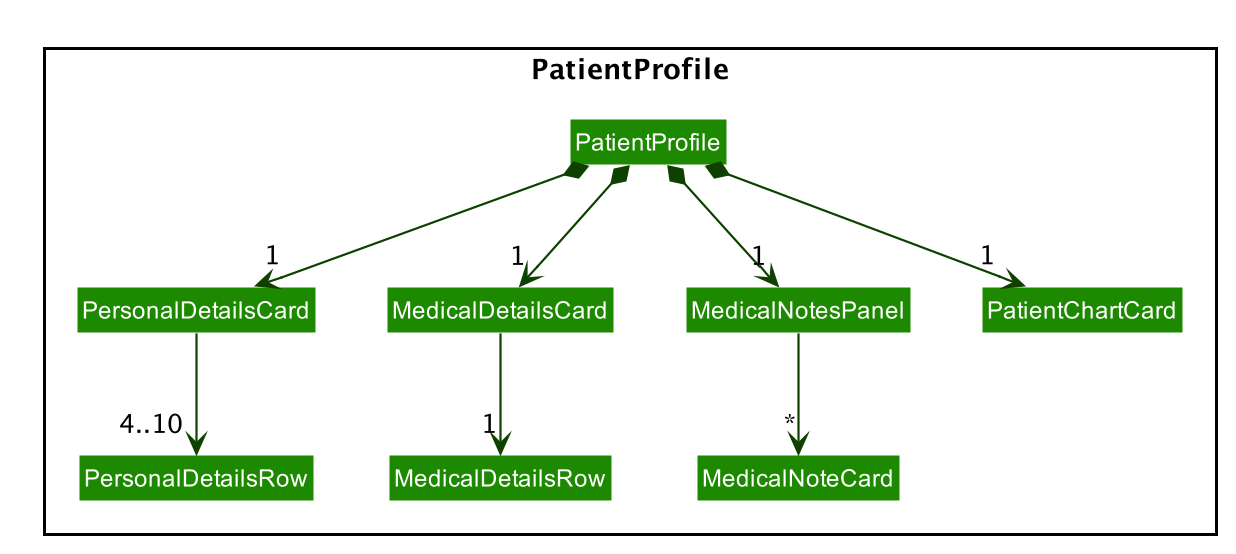
Notes:
- All classes used to display a patient profile (shown in the above diagram) inherit from the abstract
UiPartclass. Hence, they each represent a visible part of the UI. - Some of these classes are dependent on the
Modelpackage which is shown in the full UI diagram. Namely,PatientProfile,PersonalDetailsCard,MedicalDetailsCard,MedicalNotesPanel,MedicalNoteCardandPatientChartCard. This is to retrieve the required information of apatient.
Classes used in this implementation can be described as follows:
-
PatientProfilerepresents the whole component of the UI displaying the patient’s profile. EachPatientProfileobject contains aPersonalDetailsCard, aMedicalDetailsCardand aMedicalNotesPanel. -
PersonalDetailsCardrepresents a UI element displaying the personal details of apatient. It contains a JavaFXListViewdisplayingPersonalDetailsRowinstances. The corresponding UI element is displayed on the top left of thePatientProfileUI element. -
MedicalDetailsCardrepresents a UI element displaying the medical details of apatient. It contains a JavaFXListViewdisplayingMedicalDetailsRowinstances. The corresponding UI element is displayed on the bottom left of thePatientProfileUI element. -
MedicalNotesPanelrepresents a UI element displaying theMedicalNotes of apatient. It contains a JavaFXListViewdisplayingMedicalNoteCardinstances. The corresponding UI element is displayed on the right of thePatientProfileUI element. -
PersonalDetailsRowrepresents a singlepatientpersonal detail. It provides the graphics for a row in theListViewofPersonalDetailsCard.
-
MedicalDetailsRowrepresents a singlepatientpersonal detail. It provides the graphics for a row in theListViewofMedicalDetailsCard. -
MedicalNoteCardrepresents a singleMedicalNote. It provides the graphics for an element in theListViewofMedicalNotesPanel.PatientChartCardrepresents a UI element displaying the height, weight and BMI charts of apatient.
PatientProfile is displayed on the MainWindow when the AccessCommand is invoked. The following sequence diagram shows how accessing a PatientProfile works:
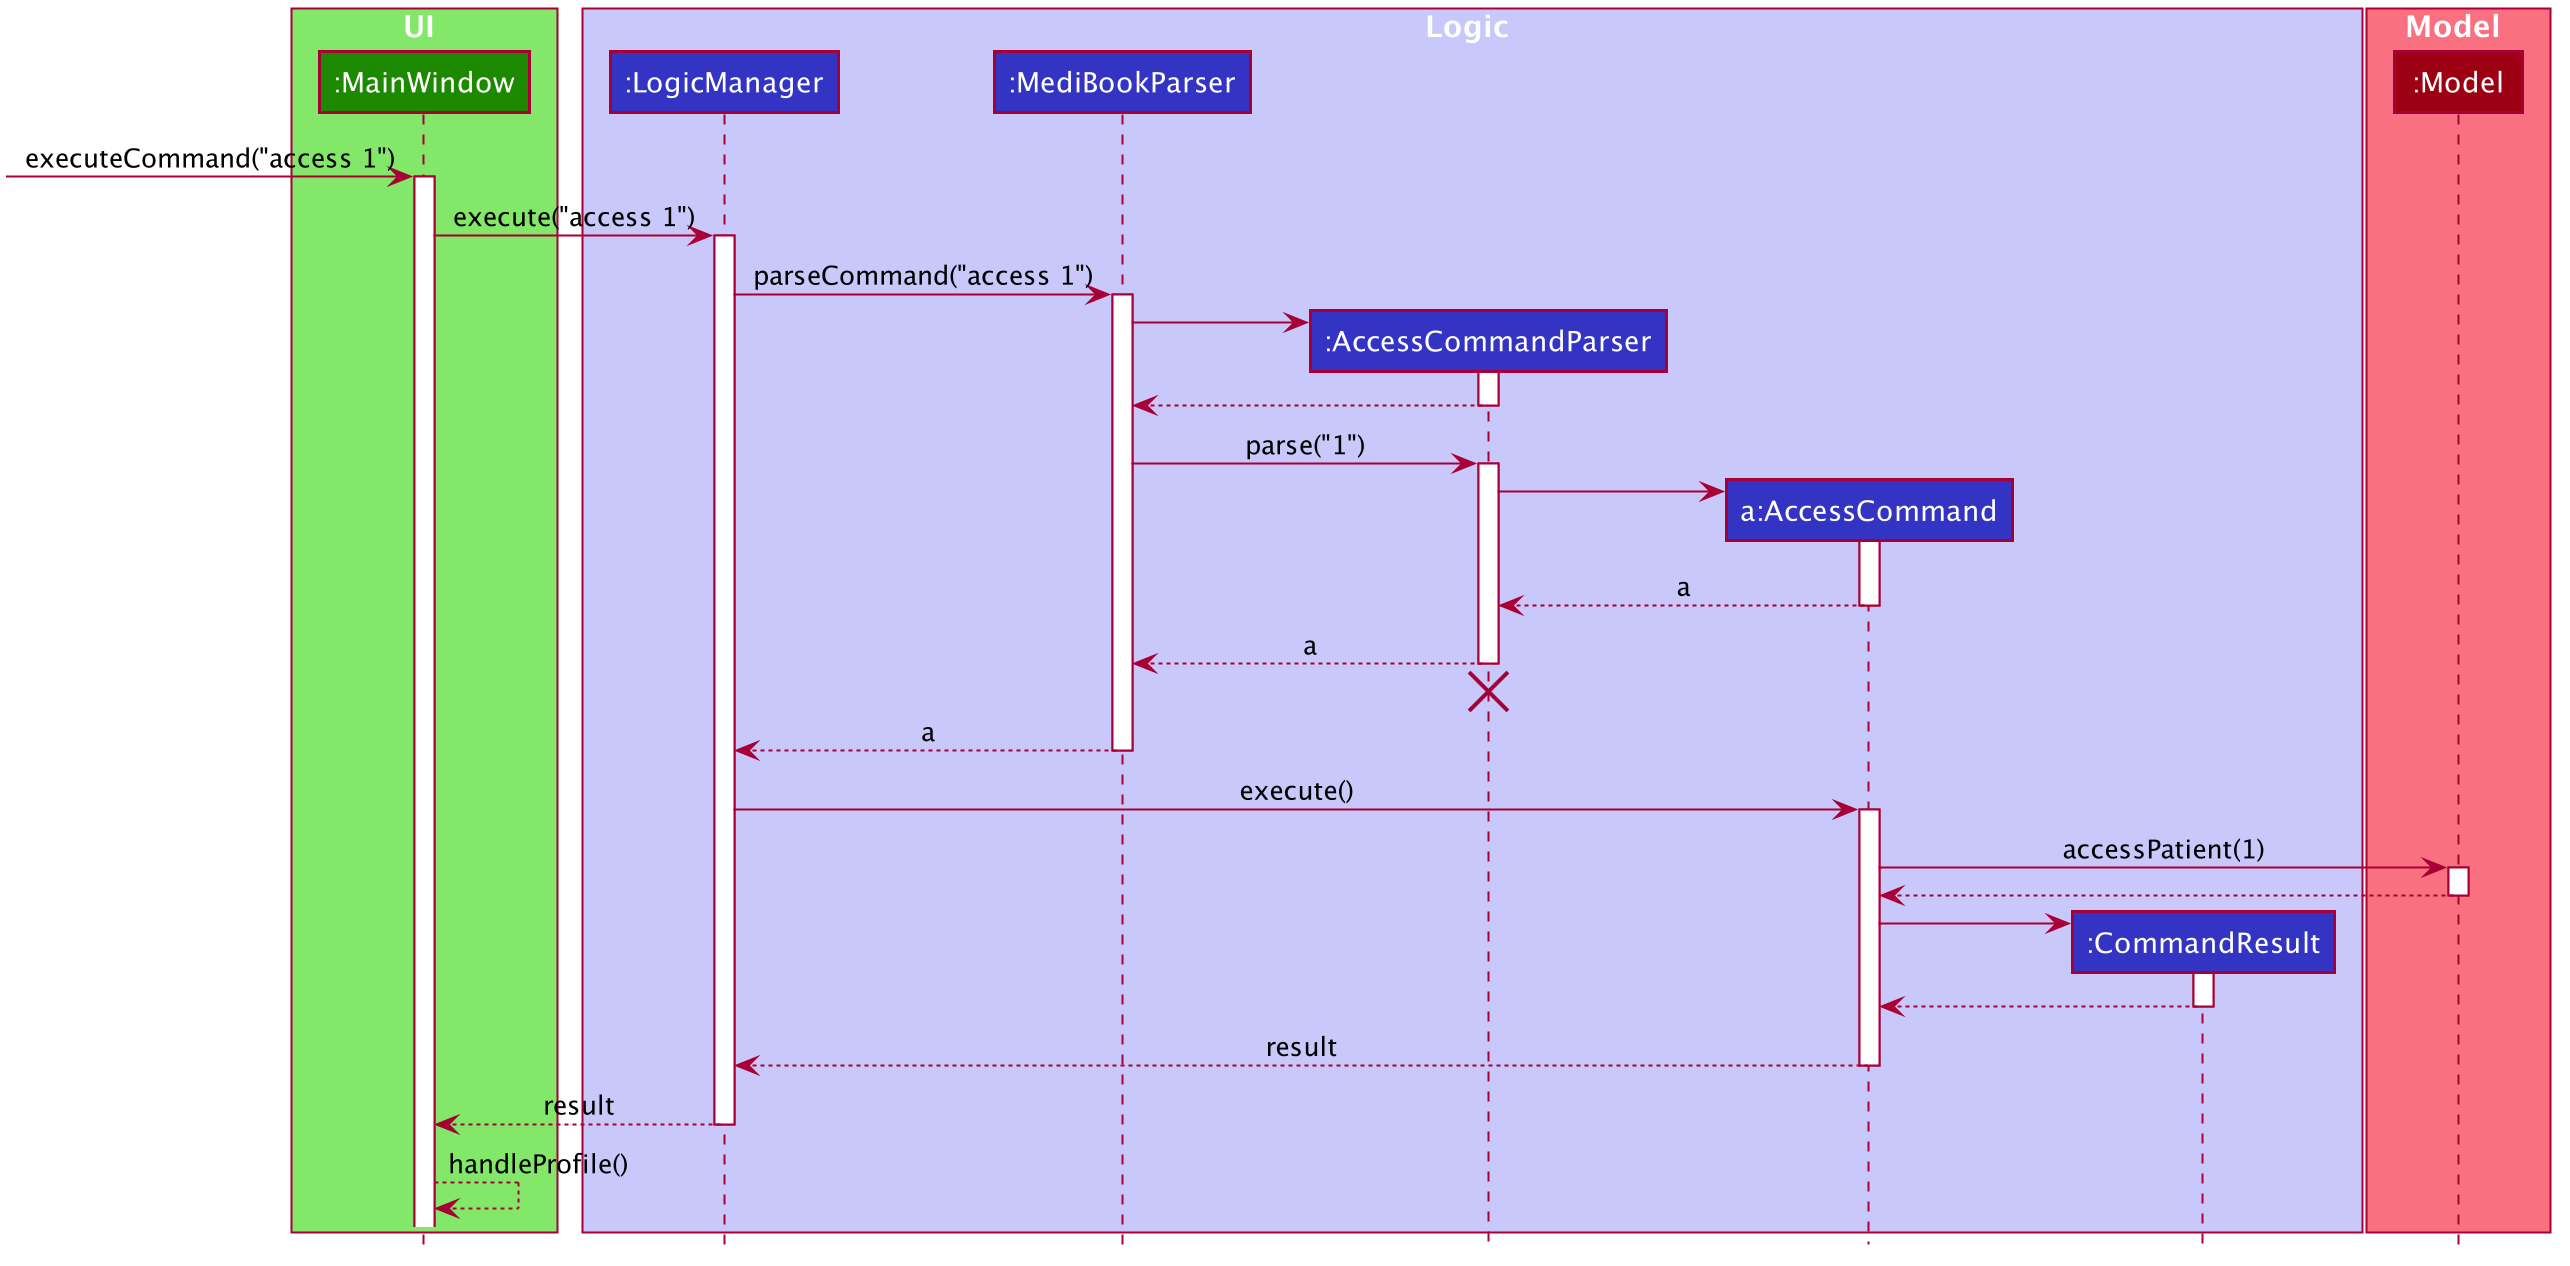
- When the access command is parsed, the
access()command is called in the model so it remembers which patient is accessed. - The
commandResultis then passed all the way back up to the UI, where thehandleProfile()method is called andPatientListUI region is changed to thePatientProfileregion.
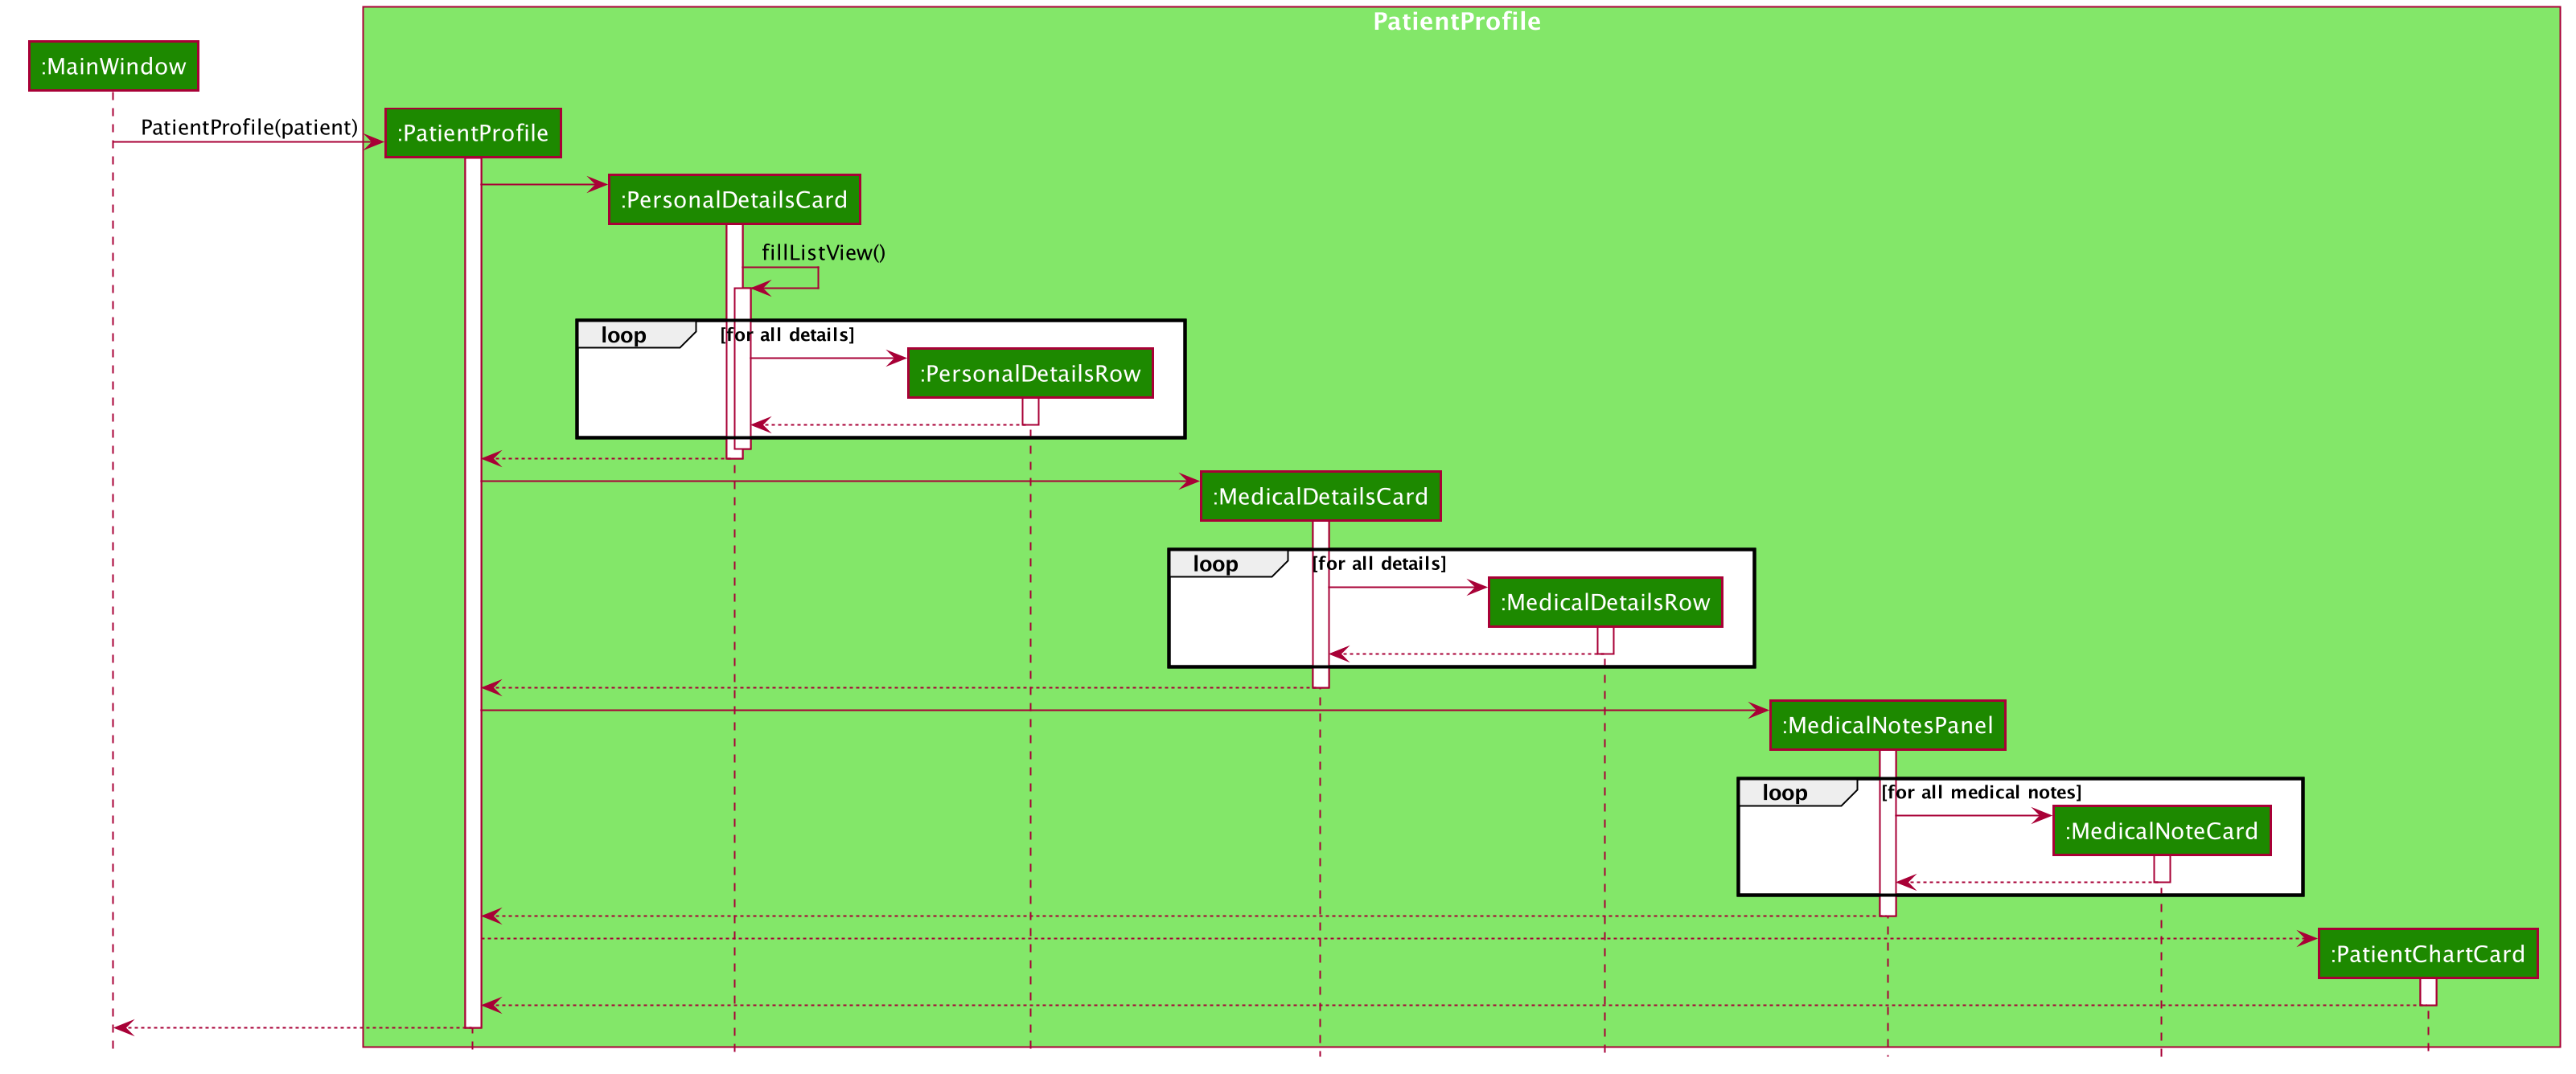
Thereafter, this next sequence diagram shows how displaying the PatientProfile works:
Context interface
The Context interface acts as a way for MediBook to store the information pertaining to what command was just executed.
The main reason for needing a Context interface is due to the Command design pattern used in the application.
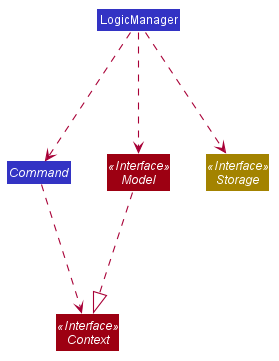
Referring to the class diagram above, LogicManager is dependent on Model, Command and Storage. Depending on the
command that was executed, LogicManager might want to call different methods from the Storage interface. For example,
if the user wants to edit the IC of a patient, LogicManager would want to call the method from Storage that would rename the
medical notes files of the patient to fit the newly updated IC.
However, due to polymorphism and the command design pattern, LogicManager does not know what command is being executed yet, it
needs to know this information in order to decide what to do next. The Context interface is thus implemented to solve this issue while
maintaining the command design pattern.
When any command that can affect the logic within LogicManager is executed (such as EditCommand, AccessCommand etc..), the relevant
command objects would call the relevant setter method from the class that implements the Context interface. LogicManager then retrieves
this information from that very same class, thereby solving the issue without causing any cyclic dependencies while maintaining the command design pattern.
Note:
Some of the commands that makes use of the Context interface are:
AccessCommandAddCommandAddNoteCommandClearCommandDeleteCommandDeleteNoteCommandEditCommandEditNoteCommand
Charts and Record class
This feature allows MediBook to display charts of a patient’s past height, weight and BMI records in the patient profile page.
Implementation
The datapoints displayed on the charts are all obtained from the Record class. As seen in the Model Component section,
a patient contains a single Record object in its field. The Record class contains two different HashMap that maps
a Date object to a Height or Weight object.
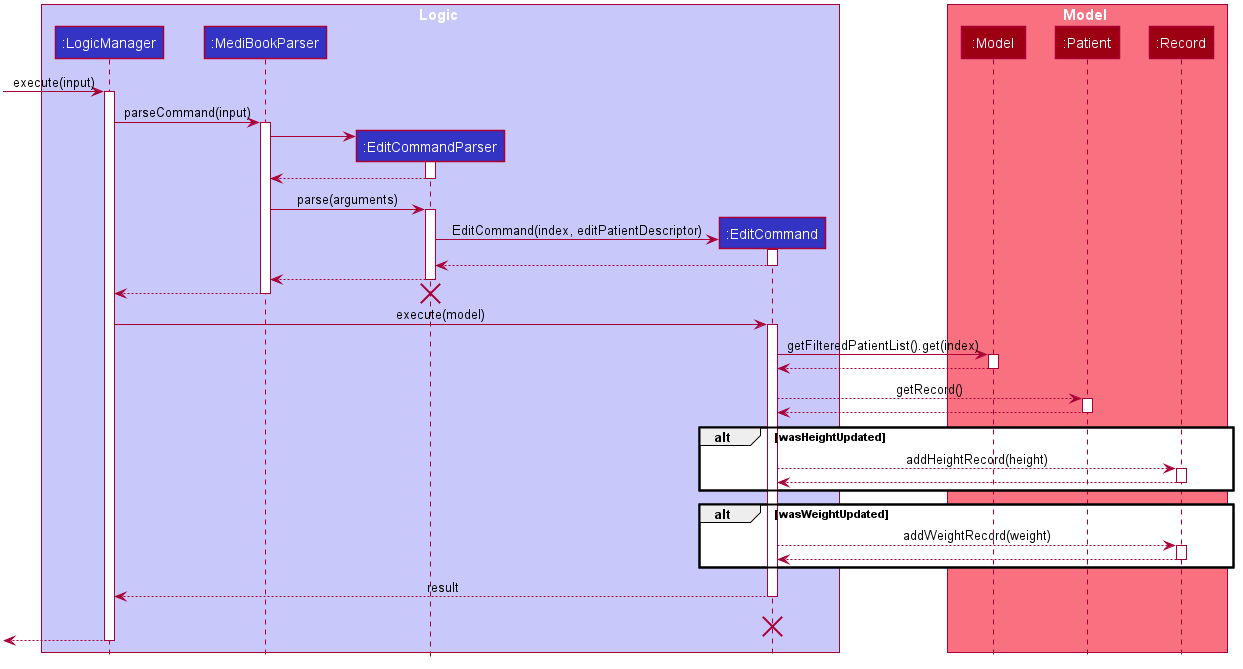
Everytime a command that updates a patient’s Height or Weight is executed, the new Height or Weight would be added
to the Record object along with the current Date. This means that only AddCommand and EditCommand will actually update the patient’s Record.
The sequence diagram above shows how a patient’s Height or Weight is updated conditionally when an EditCommand is executed.
The sequence diagram for AddCommand would look similar to this diagram as well.
-
Step 1: An inputs an
EditCommandfor exampleedit n/John p/94347823 .... -
Step 2: MediBook then parses the input and executes it through the
EditCommandobject created. -
Step 3: The
EditCommandobject then retrieves the patient that is being edited from theModel. -
Step 4: The
EditCommandobject then checks if theHeightorWeightof the patient was updated. If either one of the field was updated, theaddHeightRecordandaddWeightRecordmethods would be called in order to store the newly updatedHeight/Weight.
Documentation, logging, testing, configuration, dev-ops
Appendix: Requirements
Product scope
Target user profile:
- has a need to keep track of a significant number of patients
- prefer desktop apps over other types
- can type fast
- prefers typing to mouse interactions
- is reasonably comfortable using CLI apps
Value proposition:
- Helps users manage a central database for keeping track of patients’ records efficiently.
- Manage patients’ records quickly through a simple and intuitive UI.
- Eliminates the need for physical copies of patients’ records.
- Efficient sharing of data of patients between hospital staff i.e. administrators, nurses, doctors, specialists, etc.
User stories
Priorities: High (must have) - * * *, Medium (nice to have) - * *, Low (unlikely to have) - *
| Priority | As a … | I want to … | So that I can… |
|---|---|---|---|
* * * |
new user | see usage instructions | refer to instructions when I forget how to use the App |
* * * |
administrative staff | add a patient along with their details (fields) | keep track of their details |
* * * |
administrative staff | delete a patient’s records | remove unwanted records from the system |
* * * |
administrative staff | search for a patient’s information | retrieve his/her details |
* * * |
administrative staff | edit a patient’s details | update their details |
* * * |
doctor | add a medical note | keep track of their medical history and store consultation notes |
* * * |
doctor | delete a medical note | remove wrong entries |
* * * |
doctor | edit a medical note | correct wrong entries |
* * * |
doctor | view a patient’s medical details | decide on the appropriate treatment or prescription for the patient |
* * |
doctor | view a chart of a patient’s height and weight | track the progress of my patient over a period of time |
Use cases
(For all use cases below, the System is the MediBook and the Actor is the user, unless specified otherwise)
UC00 Login
MSS
- User requests to login with their username and password.
-
MediBook switches from the login window to the main app window.
Use case ends.
Extensions
- 1a. MediBook detects an invalid username or password. *1a1. MediBook shows an error message. *1a2. User requests to login again but with edited inputs. Steps 1a1-1a2 are repeated until the username and password entered are valid. Use case resumes from step 2.
UC01 Create an account
MSS
- User requests to create a new account with their details. (username, password, name and MCR)
-
MediBook switches from the create account window to the main app window.
Use case ends.
Extensions
- 1a. MediBook detects an invalid username, password, name or MCR. *1a1. MediBook shows an error message. *1a2. User requests to create an account again with edited inputs. Steps 1a1-1a2 are repeated until the username, password, name and MCR are valid. Use case resumes from step 2.
UC02 Add a patient
MSS
- User requests to add a patient along with the patient’s details.
-
MediBook adds the patient to it’s database.
Use case ends.
Extensions
- 1a. MediBook detects an error in one/some of the fields for the patient’s details.
- 1a1. MediBook shows an error message.
- 1a2. User requests to add the patient again but with edited details. Steps 1a1-1a2 are repeated until the fields provided are correct. Use case resumes from step 2.
- 1b. MediBook detects a missing compulsory field.
- 1b1. MediBook shows an error message.
- 1b2. User requests to add the patient again but with compulsory field added. Steps 1b1-1b2 are repeated until the compulsory fields are all provided. Use case resumes from step 2.
UC03 Find a patient
MSS
- User requests to find a specific patient.
-
MediBook returns the patient.
Use case ends.
Extensions
- 1a. MediBook detects an error in the syntax of the command.
- 1a1. MediBook shows an error message.
- 1a2. User requests to find the patient again but with an updated syntax. Steps 1a1-1a2 are repeated until the syntax of the command is correct. Use case resumes from step 2.
UC04 Delete a patient
MSS
- User requests to delete a specific patient.
-
MediBook deletes the patient.
Use case ends.
Extensions
-
1a. MediBook detects if the given index is invalid.
- 1a1. MediBook shows an error message.
- 1a2. User requests to delete a specific patient by changing the input index. Steps 1a1-1a2 are repeated until the index provided is valid. Use case resumes from step 2.
UC05 Accessing a patient’s profile
MSS
- User requests to access a specific patient’s profile.
-
MediBook display’s the patient’s profile.
Use case ends.
Extensions
-
1a. MediBook detects if the given index is invalid.
- 1a1. MediBook shows an error message.
- 1a2. User requests to delete a specific patient by changing the input index. Steps 1a1-1a2 are repeated until the index provided is valid. Use case resumes from step 2.
UC06 Adding a medical note to a patient’s profile
MSS
- User accesses a specific patient’s profile (UC05).
- User requests to add a medical note to the patient’s profile.
-
MediBook adds a medical note to the patient’s profile.
Use case ends.
Extensions
- 2a. MediBook detects an error in the syntax of the command.
- 2a1. MediBook shows an error message.
- 2a2. User requests to find the patient again but with an updated syntax. Steps 2a1-2a2 are repeated until the syntax of the command is correct. Use case resumes from step 3.
UC07 Editing a medical note in a patient’s profile
MSS
- User accesses a specific patient’s profile (UC05).
- User requests to edit a medical note in the patient’s profile.
-
MediBook edits the medical note specified by the user.
Use case ends.
Extensions
- 2a. MediBook detects an error in the syntax of the command.
- 2a1. MediBook shows an error message.
- 2a2. User requests to find the patient again but with an updated syntax. Steps 2a1-2a2 are repeated until the syntax of the command is correct. Use case resumes from step 3.
UC08 Deleting a medical note from a patient’s profile
MSS
- User accesses a specific patient’s profile (UC05).
- User requests to delete a medical note from the patient’s profile.
-
MediBook deletes the medical note specified by the user.
Use case ends.
Extensions
-
2a. MediBook detects if the given index is invalid.
- 2a1. MediBook shows an error message.
- 2a2. User requests to delete a specific patient by changing the input index. Steps 2a1-2a2 are repeated until the index provided is valid. Use case resumes from step 3.
Non-Functional Requirements
- Should work on any mainstream OS as long as it has Java
11or above installed. - Should be able to hold up to 1000 patients without a noticeable sluggishness in performance for typical usage.
- A user with above average typing speed for regular English text (i.e. not code, not system admin commands) should be able to accomplish most of the tasks faster using commands than using the mouse.
- Should be simple enough for those who are not proficient in using computers to use.
Glossary
- Mainstream OS: Windows, Linux, Unix, OS-X
-
IC: IC in our system refers to the patient’s identification numbers as provided in the NRIC or FIN.
- The National Registration Identity Card (abbreviation: NRIC) is the compulsory identity document issued to citizens and permanent residents of Singapore.
- A Foreign Identification Number, or FIN, is issued to an individual who is a permanent resident of Singapore and long-term pass holders by the Singapore government.
Appendix: Instructions for manual testing
Given below are instructions to test the app manually.
Launch and shutdown
-
Initial launch
a. Download the jar file and copy into an empty folder
b. Double-click the jar file Expected: Shows the Login GUI. The window size may not be optimum.
c. User can login using a username or password if they already have one or pick the
create accountoption instead.d. After users login/create account, the GUI will show a set of sample contacts.
-
Saving window preferences
a. Resize the window to an optimum size. Move the window to a different location. Close the window.
b. Re-launch the app by double-clicking the jar file.
Expected: The most recent window size and location is retained.
Deleting a patient
-
Deleting a patient while all patients are being shown
a. Test case:
delete 1
Expected: Patient with index 1 in the list is deleted from the program. Details of the deleted patient shown in the status message. Timestamp in the status bar is updated.b. Test case:
delete
Expected: No patient is deleted. Error details shown in the status message. Status bar remains the same.c. Other incorrect delete commands to try:
delete <index outside of list range>,delete x
Expected: Similar to previous.
Saving data
-
Dealing with missing/corrupted data files
a. To simulate missing data file:
- Delete medibook.json file located in
/data. - Run MediBook.
Expected: MediBook starts up with a sample list of 6 patients.
b. To simulate corrupted file:
- Locate medibook.json file located in
/data. - Change the field input of a patient to a wrong format. e.g. Change the IC of a patient in the json file to start with ‘A’ instead of the legal letters ‘S,T,F,G’.
- Run MediBook.
Expected: MediBook starts up with no patients in the list. A warning is displayed in console “Data file not in the correct format. Will be starting with an empty MediBook”.
- Delete medibook.json file located in